Warbird Alley
Fairchild
PT-26 Pilot Report
by Boots McCormick
|
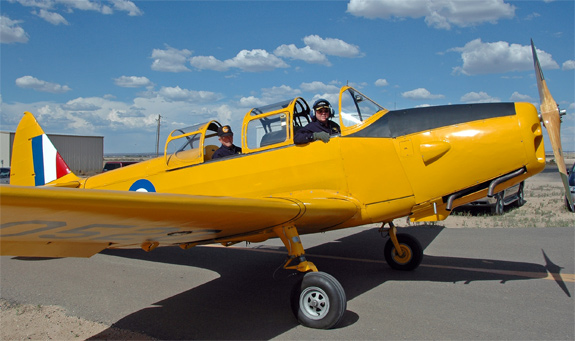
I’ll admit, it’s a unique looking airplane. While it has the same airframe as its easily recognizable cousins the PT-19 and PT-23, the addition of the canopy seems to throw people off. With the approach of WWII, the Fairchild company added a canopy to its already successful PT-19 design, and sold 670 of them to Canada. The additional protection of an enclosed cockpit was a huge benefit in the northern climate. Fleet aircraft produced them under license in Canada and in the British Commonweatlh custom of naming training aircraft after famous universities, they dubbed it the PT-26 the “Cornell”. The body is fabric over metal frame, but the wings and tail are made of wood. This factor alone contributes to the fact that there aren’t many of them around these days. Before you start your preflight, climb up onto the back of the wing (being careful to stay on the walkway) and stick your head in the cockpit. Make sure the Master and Magnetos are off, and the control lock is not engaged. The control lock is a metal device that stows underneath the instrument panel. To engage it, you pull the stick all way aft, and lower the end of the control lock over the handgrip. To disengage, do the opposite. For the walkaround, you start behind the left wing and walk clockwise from there. Check the aileron and hinges for freedom of movement, then make sure the flap hinge is secure. The flaps are the split type, so you'll have to bend down to look. The wing is covered in very thin plywood underneath the fabric, so it shouldn’t have any holes or dents. While you are behind the wing, you also need to check the fuel sight gauge located right next to the filler cap. They are easily visible from the cockpit, and are marked in quarters of a tank. The filler caps are enclosed under a dust cover secured by Dzus fasteners. If you need to put fuel in, it's much easier to drag the hose around behind the wing and fill it from the aft side. That way you can see into the filler neck and prevent an overflow. (Some of us learned that the hard way. These days, with corporal punishment being meted out for spilling gas on the ramp, it pays to pay attention!) As you pass by the end of the wing, check out the integral handles cut out of the wingtip. These come in very handy when moving the aircraft. Once in front of the wing, check tire pressure and oleo extension. The oleo struts use a combination of hydraulic and pneumatic pressure, both of which need to be at the right PSI. Servicing information is conveniently located on placards on the front of the gear. More on the oleo gear later. Open the fire extinguisher door in front of the left wing root. Inside, you'll see the fire extinguisher tucked in between the rudder pedals. A note in the pilot manual reads: “CAUTION - DO NOT USE THE FIRE EXTINGUISHER INSIDE THE COCKPIT WITHOUT FIRST OPENING THE ENCLOSURE”. As with any other Note, Warning, or Caution in a military flight manual, someone probably found that one out the hard way! Ensure the cowling is secured by the Dzus fasteners, and move to the front of the aircraft. Make sure no small animals are nesting in the intakes, then step back and look at the prop. Check for any damage or delamination. Now the real work begins. You'll need to pull the big wooden prop through 12 blades to get rid of any excess oil that may have collected in the cylinders. By purging it out the exhaust before starting, you'll prevent a possible hydraulic lock. Ranger engines are hard to come by, so every little bit of precaution helps. Check the oil quantity inside the door on the right side cowling, then move around to the right wing. Check the right wing like you did the left (and watch out for the pitot tube!), then check the tail wheel pressure and the condition of the empennage. Walk out in front of the PT and do a last “big picture” check for tie downs, chocks, or airport dogs that might be a factor. Now climb back up onto the wing, step over the canopy rail, and settle into the cockpit.
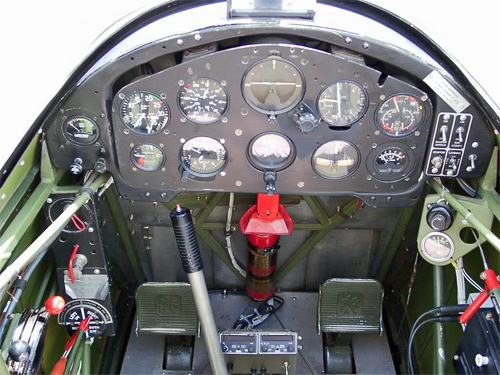
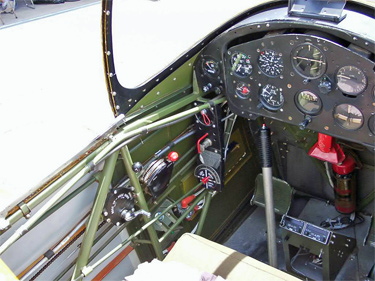
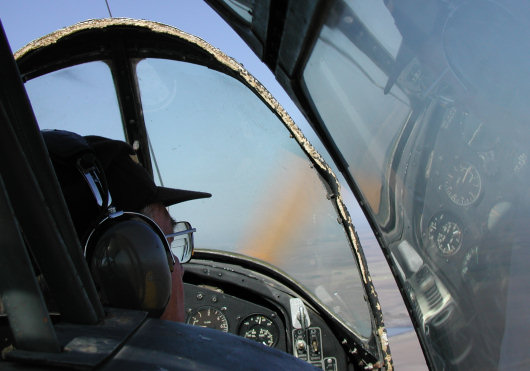
The first thing you notice as you sit down in the front seat is that the cockpit is BIG. As a fellow of a more robust stature, I have shoehorned myself into everything from a J-3 to an F-16 and found most airplanes to be a bit wanting in elbow (or head!) room for a 6’2” pilot. When you look at pictures of WWII flight crews, they rarely look like linebackers, and it's easy to see why. Not a problem in the PT! There's plenty of shoulder, head, and leg room. The seat moves up and down, and the rudder pedals adjust forward and aft with the push of a toe lever next to each one, ala King-Air. The floorboard is laminated plywood in the back seat and bare metal in the front, adding to its already classic military feel. The instrument panel is a nice distance from the pilot. The artificial horizon takes up the center, with the old-style whiskey compass below it. Engine and other instruments take up both sides. The stick has a long throw, and the quadrant, containing the throttle and the mixture, is on the left side of the cockpit, right next to your knee. A word of caution. The mixture control was designed backward from the U.S. standard. So if you push the mixture forward, you're moving towards the cut-off position. [Editor's Note: This "backward" mixture control was also a common feature on other BCMTP (British Commonwealth Military Training Program) aircraft, including the Harvard.] Fortunately, you don’t need to monkey with the mixture very often, so the chance for an inadvertent stoppage is reduced. Just be careful on that GUMPS check! (Gas, Undercarriage, Mixture, Prop, Switches). Next to the throttle quadrant is an elevator trim crank. It's attached to a bicycle-style chain and cable which runs clear back to the tail. Starting from a neutral position (verified visually!), select three notches of nose-up trim with both seats occupied, or two if you're solo.
As the Ranger kicks over, you get that great smell of oil, dope, and laminated wood that anyone who enjoys flying rag wing aircraft will appreciate. As the engine warms up, you can take a minute to enjoy the ambience. Once everything warms up, it’s time to taxi out. As you begin taxiing, you'll see that the visibility over the nose is excellent. You can see the ground about five feet in front of the prop, eliminating the need for constant S-turning. This is good thing. The tail wheel is a long way back there (the Cornell is only about 2 feet shorter than the AT-6 Texan), and not as responsive at taxi speeds as some of the other tailwheel aircraft I have flown. You need to give plenty of lead time with the rudder pedals when making ninety degree turns. If you need to turn tighter, a sharp stab on one of the brakes will castor the tail wheel and allow you to turn in a much smaller radius.
Now it’s time for the run-up. Point into the wind, and make sure your feet are on the brakes. You check the flaps up by looking at the handle down by your feet. Run the engine up to 1700 RPM for the mag check, and then up to full throttle to make sure you get a minimum of 1900 RPM at full static power. Also, make sure the cylinder head temperature is below 205° C, and the mixture is full RICH -- all the way aft! This definitely takes some getting used to. Check that the oil temp is 35° C minimum. After you check the flight controls and make sure your shoulder harness is locked, it’s time to go flying! One of the truly great aspects of flying a tandem seat warbird is being able to fly with the canopy open. It is a little noisy, but there is very little wind in the cockpit, and few things can compare cruising around with your left elbow up on the rail and a big grin on your face. The PT-26 doesn’t exactly charge down the runway. At well over a ton with gas and pilots, it uses every bit of the Ranger’s 200 horsepower. After you advance the throttle, you will begin to feel some wind across the elevator. As you accelerate past about 30 MPH, you have the nose authority to easily bring the tail up. This is the only time you will notice any yawing tendency due to torque. With the tail up, it accelerates quicker. You will feel a definite lightness on the runway as the airplane approaches takeoff speed, and at about 70 MPH the PT gently flies itself off. Best climb for all three models is 80 MPH. With two pilots, a full load of fuel, and a high density altitude like that found in the Mountain West of the U.S., you can expect a climb rate of only a few hundred feet per minute. This is not an airplane suited for hot, high, heavy, or humid conditions. At a field elevation of six thousand feet, you'll feel fortunate to have plenty of flat terrain around you to get to altitude. But hey, what’s the rush? Trim it up for about 80 MPH, keep it coordinated, and sit back and enjoy the view past the bright yellow wings.
Doing air work, you notice that the aircraft is very responsive in both roll and pitch. We aren’t talking Pitts here, but with good coordination, a light push on the stick is all you need to get the PT to do your bidding. Stalls are very straight-forward events, with the airplane stalling promptly at just above 60 MPH. In the PT I fly, the right wing tends to drop first, but a little left rudder is all it takes to re-level it during the stall recovery. The flight manual recommends not attempting to recover from the stall with the airspeed below 80 MPH. This is good advice. If you're overly aggressive, you'll pull directly into a secondary stall. Remember, this is a heavy, slightly underpowered airplane. Be gentle on the recovery, and you won’t have any problems.
Heading back to the pattern, the excellent inflight visibility becomes apparent. Since the front seat pilot sits fairly forward of the wing, front quarter visibility is better than many low wing airplanes. The canopy rail is relatively low, so that helps as well. As you approach midfield, time for your C-GUMPS check. (Carburetor Heat, plus the GUMPS items mentioned before). Remember, the mixture is backwards! If you're in the habit of habitually pushing the mixture full forward, you'll be in for a true engine-out landing. 80 MPH works well on base, and you can slow to 75 coming across the fence. With the throttle back to idle, the PT likes to come down. What initially appears to be a steep approach will usually turn out just right. A little bit of power will help arrest the descent rate, and enable you to enjoy one of the PT’s finest features – oleo struts.
As you level the airplane into a wheel landing attitude and feel it touch down, you almost can’t believe it. I had heard PT pilots talk about how good the landing gear is, but I didn’t believe it until I felt it. You almost can’t tell if you're down or not! Even when I occasionally goon up a landing and drop it in from a couple of feet up, the oleos nicely absorb the shock. It's almost embarrassing getting a feather-soft landing out of something that would have sprung a Cessna 140 back into the air like a jackrabbit. As soon as you pull off power, the tail comes right down. Bring the stick full aft and the airplane slows to taxi speed in no time.
Overall, flying the PT no more difficult than any other
midsize tailwheel aircraft, and as long as you are conscious of its somewhat
limited power, you won’t have any problems. If you get a chance to fly one
of these increasingly rare trainers, don’t pass up it up – you're in for a
great flight in a true classic. When Alton "Boots" McCormick isn't flying a Fairchild PT-26 with the Commemorative Air Force, he's either yanking and banking an F-16 with the New Mexico Air National Guard, or flying and flight instructing for the U.S. Government.
|
![]()
Visit
AviationLegends.com for more great vintage and antique aircraft images!
Submit your own pilot report! |
All text and photos on this
page courtesy of the author
and CAF unless otherwise noted.
You may not use these photos without prior permission from the artists.
Thanks to MichaelTerry at Aviation Legends for the generous use of his PT-26 aerial
image.

© 2009 The Doublestar Group
All Rights Reserved
 Once you're ready to start, put the stick back in your
lap, yell “clear,” and start pumping the wobble pump handle. Four or five
strokes (and sometimes more) bring the fuel pressure up to 3 PSI, which is
what you need to start. Mags to Left (The Left mags have the impulse
couplings for start), Master Switch to “On”, then push the starter button.
The starter will push the prop around, but like many older model aircraft,
the prop will kick back occasionally. When it does, let up on the starter
and wait for it to swing forward again before you re-engage it. When the
engine catches, immediately put the mag switch to BOTH.
Once you're ready to start, put the stick back in your
lap, yell “clear,” and start pumping the wobble pump handle. Four or five
strokes (and sometimes more) bring the fuel pressure up to 3 PSI, which is
what you need to start. Mags to Left (The Left mags have the impulse
couplings for start), Master Switch to “On”, then push the starter button.
The starter will push the prop around, but like many older model aircraft,
the prop will kick back occasionally. When it does, let up on the starter
and wait for it to swing forward again before you re-engage it. When the
engine catches, immediately put the mag switch to BOTH. 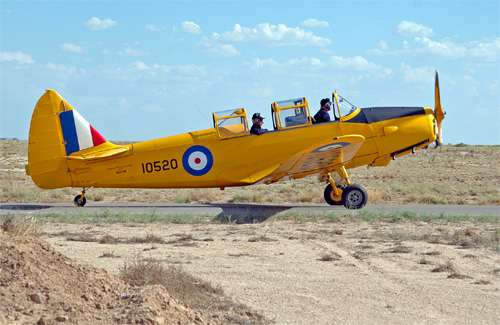

 The PT-19, 23, and 26 are all designed for aerobatics, but
we elect not to do them in ours. As there just aren’t too many of them
around, we try to be gentle with the one we have!
The PT-19, 23, and 26 are all designed for aerobatics, but
we elect not to do them in ours. As there just aren’t too many of them
around, we try to be gentle with the one we have!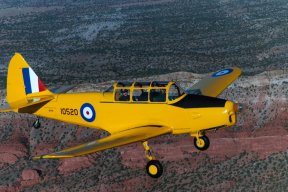 Fairchild seems to have taken modern flying into account
when they designed the landing gear in the Cornell. Back in the late
thirties, most landing fields were exactly that – fields. Pilots could
almost always land into the wind, and grass was much more forgiving than
concrete. Even when most airports began to use runways, they usually had
several spaced around the compass to minimize crosswinds for landing. As any
taildragger pilot knows, landing with a crosswind on a hard surface is a
lot trickier than landing on grass. The PT’s gear design takes a lot of the
bounce out of a wheel landing.
Fairchild seems to have taken modern flying into account
when they designed the landing gear in the Cornell. Back in the late
thirties, most landing fields were exactly that – fields. Pilots could
almost always land into the wind, and grass was much more forgiving than
concrete. Even when most airports began to use runways, they usually had
several spaced around the compass to minimize crosswinds for landing. As any
taildragger pilot knows, landing with a crosswind on a hard surface is a
lot trickier than landing on grass. The PT’s gear design takes a lot of the
bounce out of a wheel landing.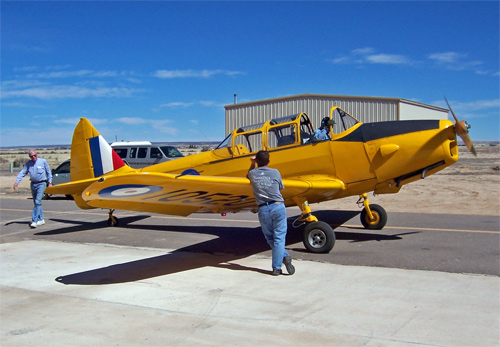 When shutting down, you should let the engine run for
three minutes at idle. Push the mixture all the way forward for cut-off, and
the prop clicks to a stop. Mags and master off. During your post-flight in nice
weather, you'll find quite a few bugs on the windscreen and the leading
edge of the wing. Unfortunately, they show up very well against the Canadian
Yellow, so a good wiping down (warm water on a clean rag work fine) is in
order. And like any other wood prop, make sure the blades are parallel to
the ground before putting the plane away in the hangar. The length of the
rudder makes a tail wheel dolly unusable, so muscle power will be in order.
There are handles on each side of the fuselage (in addition to the ones on
the wingtips) to help steer. Once the tail wheel has “broken” (castored),
steering the tail is a snap.
When shutting down, you should let the engine run for
three minutes at idle. Push the mixture all the way forward for cut-off, and
the prop clicks to a stop. Mags and master off. During your post-flight in nice
weather, you'll find quite a few bugs on the windscreen and the leading
edge of the wing. Unfortunately, they show up very well against the Canadian
Yellow, so a good wiping down (warm water on a clean rag work fine) is in
order. And like any other wood prop, make sure the blades are parallel to
the ground before putting the plane away in the hangar. The length of the
rudder makes a tail wheel dolly unusable, so muscle power will be in order.
There are handles on each side of the fuselage (in addition to the ones on
the wingtips) to help steer. Once the tail wheel has “broken” (castored),
steering the tail is a snap.